Storm Éowyn: How to Storm-Proof Your Home

Niket Kapur • 24 January 2025

Essential Tips for Securing Your Property Against Extreme Weather

Introduction: The Importance of Storm-Proofing Your Home


With Storm Éowyn currently battering the United Kingdom with winds up to 100 miles per hour and heavy rain, the importance of storm-proofing your home has never been more apparent. As extreme weather events become more frequent due to climate change, it is essential to take proactive measures to protect your property and ensure your family’s safety. This guide will help you identify key areas to strengthen and provide practical advice to safeguard your home against high winds and heavy rain.


Assessing Vulnerabilities: Know Your Home’s Weak Points


Begin by identifying areas of your home that are most vulnerable to storm damage. This includes inspecting for loose roof tiles, weak fences, and any structural issues that could worsen during a storm. Early identification of these weak points can significantly reduce the risk of damage.


Securing Windows and Doors: First Line of Defence


Ensure all windows and doors are properly sealed and secure. Storm shutters are an effective way to protect your home, and reinforcing existing windows and doors can provide additional security against high winds and debris.


Roof and Gutter Maintenance: Preventing Leaks and Damage


Regularly inspect your roof for damaged or missing tiles. Clearing your gutters of debris is essential to prevent water buildup, which could cause leaks or structural damage during heavy rain.


Outdoor Areas: Securing Loose Items and Structures


Anchor or store away outdoor furniture, tools, and decorations that could become dangerous in high winds. Pay particular attention to large trees near your property, as these pose a significant risk of falling and causing damage during severe storms.


Protecting Vehicles: Avoiding Damage from Loose Tiles and Debris


Vehicles parked in driveways are vulnerable to damage from falling roof tiles and other debris. Whenever possible, park vehicles in a garage or away from areas prone to falling objects.


Emergency Preparedness: What to Have on Hand


Assemble an emergency kit containing essential items such as torches, batteries, bottled water, and a first aid kit. Preparing in advance will help you and your family remain safe and comfortable in the event of power outages or other disruptions.


Handling Damage: Expediting Insurance Claims


If your property sustains damage, it is crucial to expedite your insurance claim. Keep all important documents accessible and take photographs of any damage as evidence. Promptly notifying your insurer will help to ensure a quicker response and repair process.


Conclusion: Staying Safe During Storms


Storm-proofing your home is a vital step in protecting your property and your loved ones from the increasing threat of severe weather. By taking these proactive measures, you can minimise damage and create a safer living environment. With Storm Éowyn serving as a timely reminder, there is no better time to prepare your home for adverse weather conditions.


by Niket Kapur 28 April 2025
Introduction Insulating your home’s external walls – whether from the outside (external insulation) or from the inside (internal insulation) – can dramatically reduce heat loss, improve comfort, and make your home more energy efficient. This guide provides a detailed, practical explanation of external wall insulation (EWI), internal wall insulation (IWI), and hybrid approaches, covering types of materials, finishes, installation methods, and key considerations for homeowners. Why Insulate Your External Walls? Lower Energy Bills Proper insulation significantly reduces the amount of heat escaping from your home, lowering your heating costs by hundreds of pounds annually. Improved Comfort Insulated walls eliminate cold spots and draughts, maintaining an even, comfortable temperature throughout your home. Protection Against Damp and Mould Keeping masonry walls warmer reduces the risk of condensation and mould formation. Breathable insulation systems can further protect against moisture issues. Enhancing Appearance External wall insulation often refreshes the external look of a property, allowing for new finishes like renders or brick slips. Increasing Property Value Energy-efficient homes are increasingly desirable. Improved EPC ratings and enhanced aesthetics can add value. Soundproofing and Fire Safety Certain materials, such as mineral wool, provide excellent soundproofing and fire resistance. Preparing for Future Heating Systems With the rise of low-temperature heating systems like heat pumps, a well-insulated home is crucial for efficiency and comfort. External vs Internal Wall Insulation: An Overview External Wall Insulation (EWI) Applied to the outside of the home. No internal disruption. Preserves indoor space. Refreshes external appearance. Requires scaffolding and possible planning considerations. Internal Wall Insulation (IWI) Applied to the inside walls. Can be installed room-by-room. Reduces internal space slightly. Preserves external appearance. Requires redecoration and careful moisture management. Hybrid Approach Combines external insulation where possible and internal where necessary. Useful for heritage properties or conservation areas. Also useful where area close to external wall is restricted size for example a shared walkway. External Wall Insulation (EWI) How It Works Insulation boards (e.g., EPS, mineral wool, phenolic) are fixed to external walls, covered with reinforcement mesh and finished with render, brick slips, or cladding. Benefits Eliminates thermal bridging. Protects the existing structure. Greatly improves thermal performance. Access and Planning Scaffolding needed. Planning permission may be required, especially in conservation areas. Structural Considerations Walls must be sound. Damp-proof course must be respected. Common Insulation Materials for EWI Expanded Polystyrene (EPS) Affordable, lightweight, good insulation value. Fire risk: must be rendered and protected. Mineral Wool Non-combustible, breathable, excellent fire and acoustic performance. Heavier and more expensive than EPS. Phenolic and PIR Boards High insulation values (thin boards). Moderately fire-resistant but combustible. Wood Fibre Breathable, eco-friendly. Requires thicker applications and careful detailing. Finishes for External Insulation Render Acrylic, silicone, or mineral renders. Range of colours and textures. Brick Slips Thin slices of real brick. Maintain traditional appearances. Acrylic faux brick often used. Cladding Timber, composite, or metal finishes. Installed on battens with ventilated cavities. Mixing Finishes Common to combine finishes (e.g., render with brick slips for front facades). Installation Process for External Wall Insulation Survey and preparation. 2. Fixing insulation boards. 3. Applying reinforcement mesh and basecoat. 4. Applying the final finish (render, brick slips, cladding). 5. Refixing external fixtures (pipes, lights, alarms). 6. Final inspection and handover. Internal Wall Insulation (IWI) How It Works Insulation is added to the internal face of external walls, finished with plasterboard. Suitable Situations Where external changes are prohibited. Room-by-room renovations. Types Rigid insulated plasterboards. Stud wall systems with mineral wool or PIR infill. Moisture Management Vapour barriers or breathable materials essential to prevent condensation. Installation Process for Internal Insulation Clear and prepare rooms. 2. Apply insulation (dot-and-dab, mechanical fixings, or stud walls). 3. Install vapour barriers if needed. 4. Finish with plasterboard and skim. 5. Redecorate and refit fixtures. Combining External and Internal Insulation (Hybrid Approach) When Appropriate Conservation areas. Tight boundaries. Specific aesthetic requirements. Advantages Maximises insulation coverage. Preserves important facades. Challenges Careful design at junctions. Moisture management essential. Comparing Insulation Options Summary Table EWI with EPS Key benefits: Cost-effective, good thermal performance Drawbacks: Fire risk if not detailed correctly EWI with Mineral Wool Key benefits: Non-combustible, breathable Drawbacks: More expensive and heavier EWI with Phenolic/PIR Key benefits: Very thin, excellent insulation Drawbacks: Combustible, costlier EWI with Wood Fibre Key benefits: Breathable, eco-friendly Drawbacks: Thicker walls, specialist installation Internal Wall Insulation Key benefits: Maintains external appearance, can be phased Drawbacks: Reduces room size, condensation risk Hybrid Key benefits: Best performance + appearance Drawbacks: Complex design, higher initial cost Conclusion: The Importance of Proper Wall Insulation Wall insulation is vital for reducing heat loss, cutting energy bills, improving comfort, and futureproofing homes against rising energy costs and regulatory changes. It is especially critical when installing low-temperature heating systems like heat pumps , which work most efficiently in well-insulated homes. Without adequate insulation, a heat pump may struggle to maintain temperatures and may consume more electricity than necessary. Done properly, wall insulation (external, internal, or hybrid) is a one-off investment that will enhance your home’s warmth, value, and energy efficiency for decades to come. Always engage qualified professionals, ensure certified systems are used, and address moisture management carefully. With the right approach, your home will be more comfortable, greener, and ready for the future. And finally … This guide is for general installation. Do rely only on your specialist adviser’s and installers. Each site is unique. The Building Guidance Partnership www.thebgp.co.uk +44 (0)20 8076 3110
by Niket Kapur 14 April 2025
By Maria Parker, on behalf of The Building Guidance Partnership After years spent supporting homeowners through renovations, refurbishments, and major house builds, I have come to recognise one of the most underestimated threats to a smooth project: decision fatigue . It is not something most people anticipate. They assume the hardest parts will be structural – digging foundations, handling planning permission, or getting the budget right. But time and again, I have seen confident, capable clients brought to a standstill by the weight of ongoing decisions. And when decision-making slows down, costs rise , timelines stretch, and tension builds – particularly between homeowners and their builders. Let me explain, and offer a few ways to avoid falling into the same trap. What is Decision Fatigue? In simple terms, decision fatigue is mental exhaustion caused by the sheer number of choices you must make. During a house build or renovation, these decisions start early and come thick and fast: • Where should the sockets go in the kitchen? • What colour grout do you want in the bathroom? • Should that internal wall be moved by 200mm? • Brass, black, chrome or stainless steel fittings? • Is that the final position for the staircase? Each choice might seem small. But taken together – over weeks or months – they can become overwhelming. At some point, the brain starts resisting further decisions. People become indecisive, irritable, or worse, disengaged. And that is where delays creep in. Case Study 1: A Delayed Kitchen Because of a Tap One client, mid-way through a large refurbishment in West London, stalled an entire kitchen installation for nearly three weeks over a decision about a boiling water tap. It was not just the tap. It was also the worktop cut-out size, the under-sink space, the filtered water compatibility, the colour matching, the brand reliability, and the energy usage. Each question led to another. Eventually, the builder had to move to another part of the house while they waited – which not only slowed things down but resulted in added costs due to subcontractor scheduling changes. This delay could have been avoided. How Builders and Project Coordinators Can Help As professionals, we need to recognise that clients are not builders. They are not used to making dozens of technical decisions a week. Support is essential. Here is how we approach it at The Building Guidance Partnership: 1. Structure the Decision-Making Process We break decisions into phases. For example: • Stage 1: Planning-Level Choices – room layout, extension sizes, stair positions. • Stage 2: Services & Infrastructure – lighting zones, socket locations, plumbing routes. • Stage 3: Finishes & Fixtures – tiles, taps, cabinetry, flooring. • Stage 4: Final Details – door handles, light switch styles, paint finishes. By spreading the load and giving clients clear deadlines, we help them feel more in control. 2. Provide Shortlists Rather Than Endless Options Builders and designers can present two or three suitable choices – not fifty. This is particularly valuable when a decision has cost or structural implications. We had a client in Harrow who was agonising over bi-fold doors for the rear extension. Instead of overwhelming him with catalogues, we presented a shortlist of three suppliers (each with known reliability and pricing), with a simple pros-and-cons table. Decision made that same week. 3. Create Mock-Ups or Use Visualisation Tools Many people struggle to picture what a change will look like. Builders can offer mock-ups, 3D renders, or even mark positions on-site with tape or chalk. I recall a project in Finchley where a couple could not agree on where the island unit should go. The builder measured and taped it out on the floor, then brought a few chairs in so they could test how it felt to move around. The decision was settled that same afternoon. Case Study 2: Stair Design Delaying the Whole Build A young family undertaking a loft conversion near Watford became paralysed by indecision over the design of their new staircase. Should it turn left or right at the landing? Should it have open treads or be fully closed? What about under-stair storage? These decisions affected the wall placements, the lighting layout, and the delivery time of key materials. Because no one pushed for resolution, the entire first fix was delayed. This is where an experienced builder or coordinator adds real value. By explaining dependencies and helping to visualise impact, they can gently push the process forward. Builders: Communicate the Consequences of Delay One of the biggest complaints I hear from builders is: “The client is taking too long to decide.” But from the client’s point of view, they often do not realise how serious a delay can be. That is why I encourage all builders to clearly explain the knock-on effects: • “If you do not confirm the lighting this week, the electrician will not return until next month.” • “We need the tile choice by Tuesday to finish the waterproofing on time.” • “Your delay in choosing the bath has now pushed back the floor tiling, which affects the joiner’s schedule.” Transparency builds trust. And it encourages clients to focus their attention where it is most needed. How Homeowners Can Protect Themselves If you are about to begin a building or renovation project, here is how you can reduce the risk of decision fatigue: • Prepare early: Visit showrooms, look through Pinterest or Houzz, and narrow down your preferences in advance. • Make a scrapbook or vision board: This helps professionals quickly understand your style and avoids repeating the same discussion. • Rely on professionals: Engage a project manager, designer, or an experienced builder who can guide you and reduce the burden. • Set time aside for decisions: Make sure you are not trying to squeeze key discussions in between meetings or while juggling childcare. Closing Thoughts Every successful building project relies not only on bricks, steel, and timber – but on thousands of decisions made at the right time. Decision fatigue can quietly erode the best-laid plans unless recognised and tackled early. At The Building Guidance Partnership, our role is not just to manage logistics. It is to protect clients from overwhelm , keep the project flowing, and help everyone – builders included – stay on track. If you are about to start a renovation or extension, speak to us. A little guidance at the right time can prevent weeks of delay and thousands in extra cost. Maria Parker The Building Guidance Partnership Helping homeowners make confident decisions and complete builds on time and on budget.
by Niket Kapur 8 April 2025
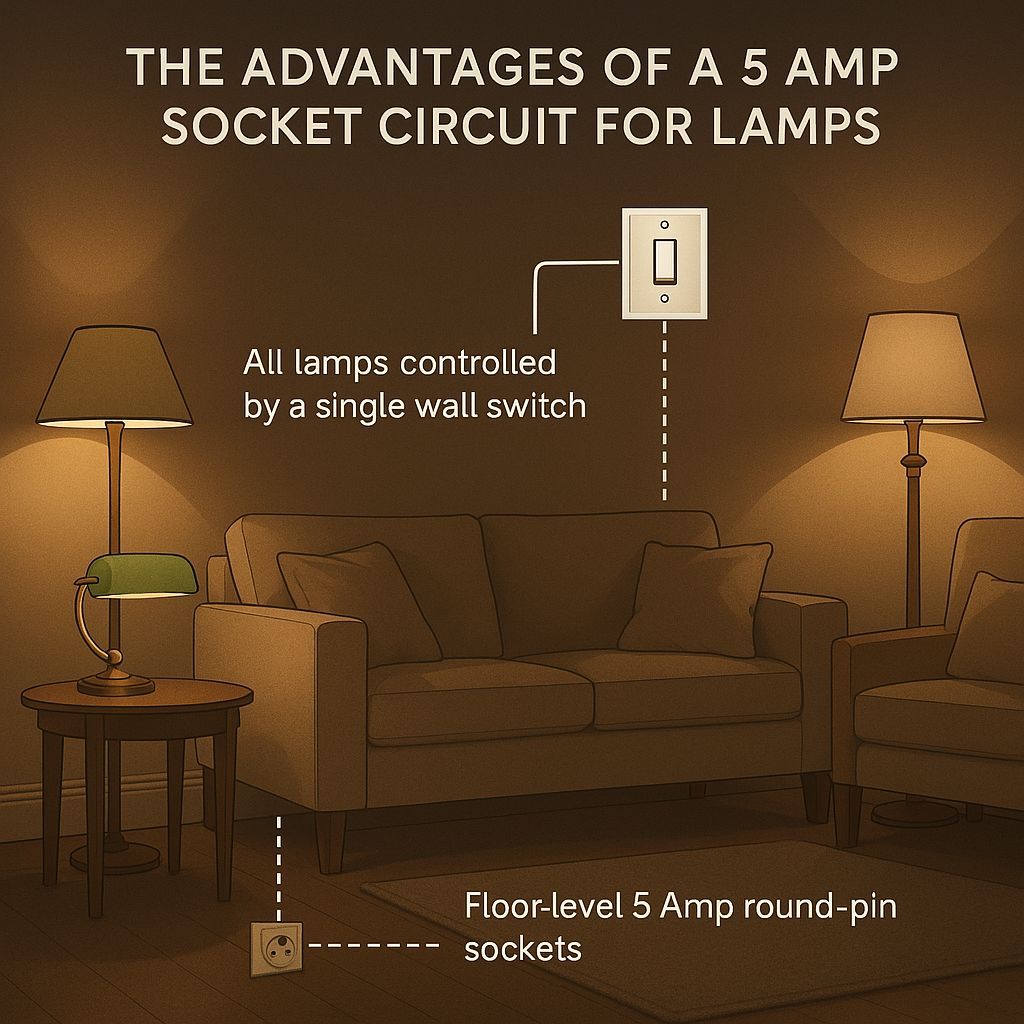
A 5 Amp socket circuit offers a refined and intelligent approach to lamp lighting within the home. Often favoured by competent interior designers, this system uses round-pin sockets, allowing multiple lamps within a room to be controlled from a single wall switch. The result is a more cohesive lighting scheme that is both practical and visually appealing. Key Benefits: • Convenience and Cohesion: Instead of switching each lamp on individually, a single switch can activate all lamps connected to the circuit. This is ideal for setting the mood instantly when entering a room, or for creating a comfortable, settled atmosphere in the evening. • Design-Led Lighting: Interior designers often specify 5 Amp circuits during the early planning stages, recognising their ability to streamline lamp lighting and eliminate unsightly trailing wires. This contributes to a neater, more curated space. • Discreet Floor-Level Sockets: These circuits are generally designed with sockets positioned at floor level, rather than on walls. This enables lamps to be placed away from wall corners - perhaps in the middle of a room near a sofa or armchair - without causing a trip hazard or cable clutter. • Safer and More Flexible Layouts: This arrangement offers greater freedom in furniture placement, supporting a layout that prioritises both aesthetics and function. It is particularly useful in living rooms, bedrooms, and snug areas where ambient lighting is a key feature. • Part of a Professional Lighting Plan: A 5 Amp circuit should ideally be considered during the early design phase of a build, extension, or refurbishment project. This allows it to be properly priced within the tender process and coordinated with other electrical work and furniture layouts. In summary, a 5 Amp socket circuit brings together elegance, functionality, and ease of use. Competent interior designers use this system to create lighting plans that feel seamless and intuitive. For homeowners embarking on a new build or renovation, it is worth exploring this option to achieve a warm, well-thought-out environment.
More posts